
Introduction
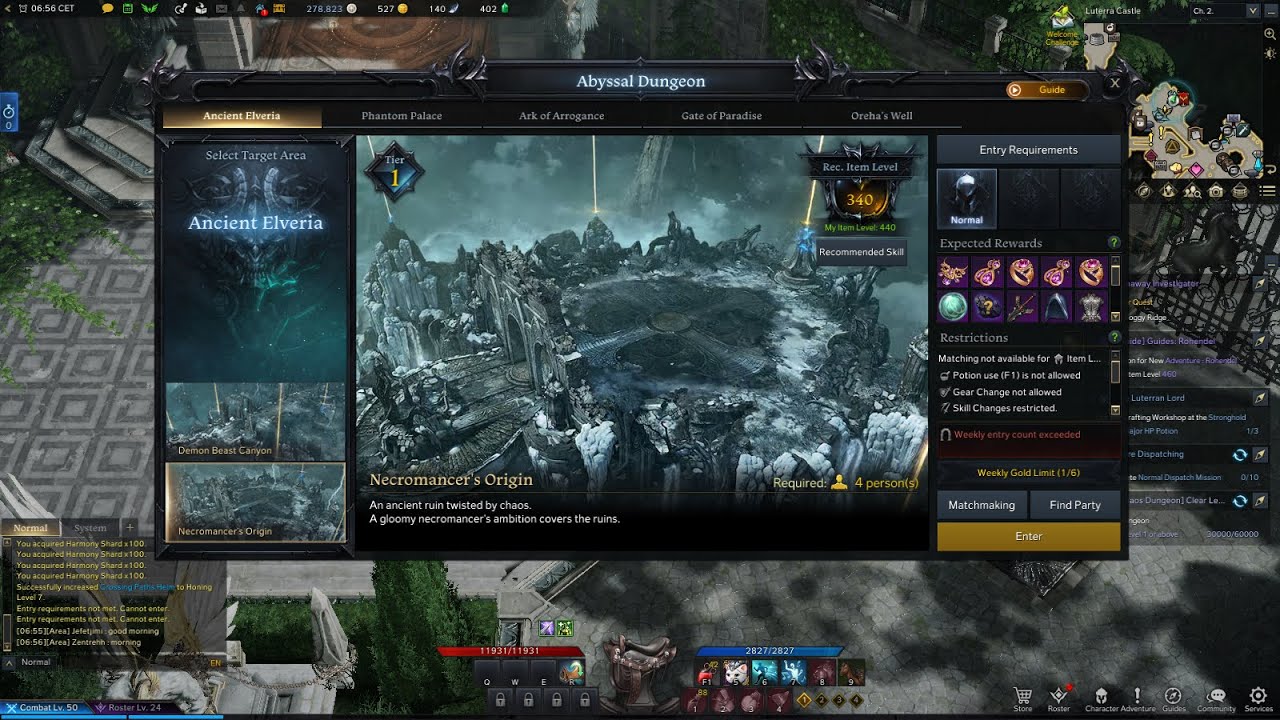
Necromancers Origin is the second Tier 1 Abyssal Dungeon in Lost Ark. You will need to reach item level 340 in order to enter this dungeon. The rewards for completing this dungeon include Tier 1 Accessories, Engraving Books, Ability Stones, Cards, and materials to craft unique gear sets.
Compared to the first Abyssal Dungeon, Demon Beast Canyon, Necromancers Origin is much more difficult. This is the first dungeon to have a team wipe mechanic, so lack of team coordination can lead to failure of defeating the bosses.
You will encounter two main bosses in this dungeon. Your team will have to defeat them in order to complete the dungeon. Reanimated Garum and Sigmund the Immortal are the two bosses you will encounter.
Reanimated Garum (First Boss Encounter) Main Mechanics
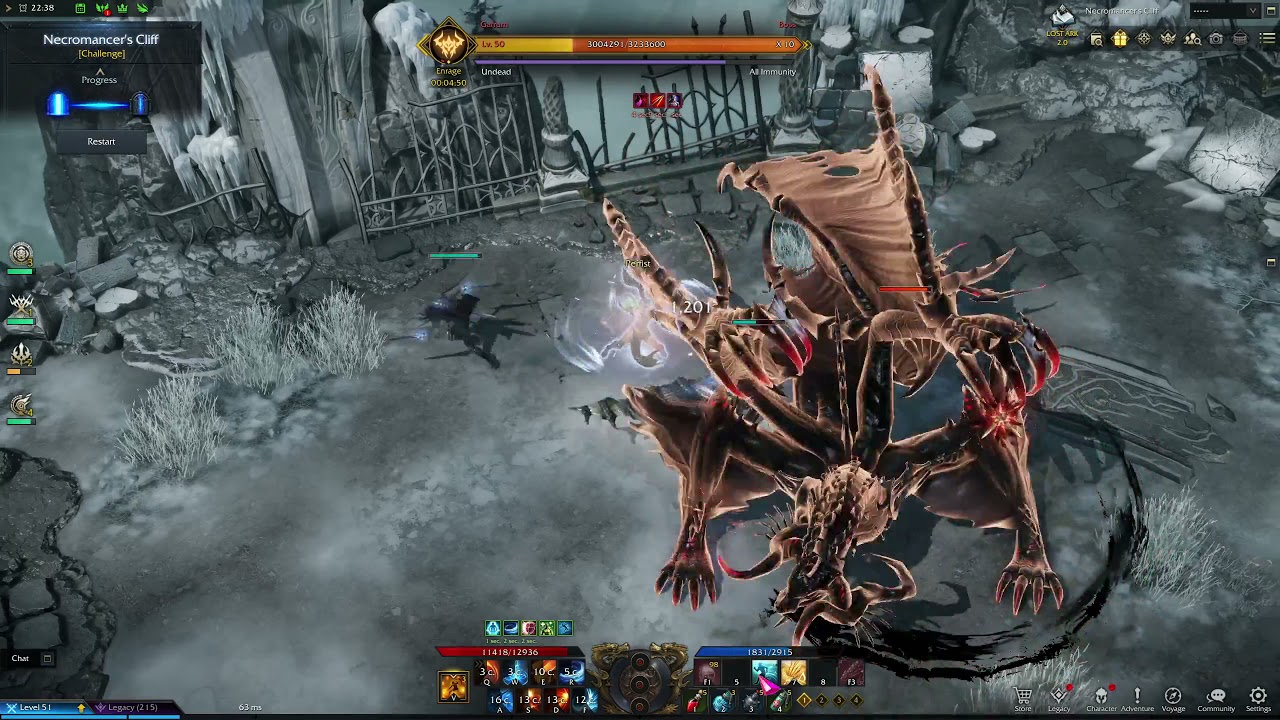
This boss is the first boss in Necromancers Origin. He is slow but has huge area of affect (AoE) attacks. You can avoid the AoE attacks pretty easily, but players must remain aware of the Death Marks above their heads.
Reanimated Garum will periodically place a Death Mark on each player. You will be able to see the amount of marks placed on each players head by an indication above their head. The entire party will be wiped if any player receives a 5th mark. Players can remove all the marks placed on them by interacting with a light orb.
Each time a death mark is applied there will also be one light orb placed in a random location by the boss. You will also be able to see the light orb on the mini map. It will appear as a yellow dot. Only one player can interact with each orb.
The method of preventing a group wipe is to rotate the player that interacts with the orb. You will need to allow the first player in the party to interact first, the second to interact second, and so on. This type of coordination is imperative in order to defeat Reanimated Garum.
After a full rotation players will then need to pay attention to the marks above their heads. The player marked next would then need to interact with an orb.
Reanimated Garum Notable Attacks
Reanimated Garum has a few other attacks that players should be aware of as well:
Quick Dash – The boss will dash quickly towards a player. This attack deals low damage and will stagger players on hit.
Swipe Combo – Garum will swipe with his claws 3 times. This attack deals low damage and will stagger players on hit.
Tail Swipe – The boss swipes his tail once and then follows up with another stronger swipe. There is a short delay between swipes. This attack will deal damage and knock players back on hit.
Shockwave – Garum will slam the ground in front of him. This causes a shockwave in a large radius around the point of impact. In order to avoid getting hit you need to dodge move towards the initial impact area.
Front and Side Cone – The boss will perform a stationary Cone AoE attack to both left and right sides of him and then to the front and back of him. This attack deals low damage and will knock players back on hit. It can be repeated up to 2 more times in succession, and each time will will cover a bigger area. The attack pattern between front and side rotations can change during these attacks. This attack is a slow and stationary attack so you utilize this time to deal good amounts of DPS.
Explosion – The boss activates a large AoE explosion. If you’re caught in the radius you will receive a decent amount of damage and will be knocked up on hit.
Stacked Explosion – Garum activates another explosion. However, this explosion has an inner and outer radius. You will be able to see the radius of the explosion telegraphed with the red outlines. You will need to be in between the two explosions to be safe from getting hit.
Sigmund the Immortal (Second Boss Encounter) Main Mechanics
This is the second boss in the Necromancers Origin. The main mechanic to be aware of during this fight is the Revive mechanic. The boss will revive multiple times after death, and the amount of times he revives depends upon your group’s execution of the mechanic during the fight.
Once Sigmund hits 0 hits points he will send out a red or white shockwave. Paying attention to this color is very important. At the time of the shockwave there will be two orbs (one red and one white) placed at every cardinal direction (N, E, S, W). Each member of the party needs to go to one of those positions as soon as the boss hits 0 HP.
Once at your position you will need to correctly choose the color of the orb based on the color of the shockwave. If everyone in the party chooses the correct orb color before the boss revives then you group will only need to perform this process one more time before Sigmund will permanently die.
Each time Sigmund revives his attacks will be stronger. Also, for every wrong orb that your group picks up the boss will revive with more hit points. If your group picks up a wrong orb you will also have to go through the cycle an additional time.
Sigmund the Immortal Notable Attacks
Sigmund the Immortal has a few other attacks that players should be aware of as well:
Teleport – Sigmund will teleport to a random location.
Edge Teleport – The boss will teleport to a random location near the edge of the arena. Once he’s there he will activate an ability that covers the entire arena. You will have to make your way towards to the safe spot before the attacks finishes to avoid taking damage. The new location of the boss will marked on the mini map, and if you pay attention to the expanding direction of the red telegraph it can be predicted.
Leap – Sigmund will leap towards a player. If hit the attack will cause knockback on hit, and after the initial hit a shockwave will be sent out. The shockwave deals a decent amount of damage and will knock players up on hit. In order to avoid getting hit by the shockwave you will need to move to spot in front of the boss or be far away from him.
Shockwave – This attack is very similar to leap. However, there is no initial leap and the boss will just activate the shockwave. This attack is often performed after boss repositions himself in the arena.
Cone – Sigmund will spin his sphere above his head for a second and then smash it to the ground. This creates a damage cone in front of him. This attack deals low damage and will knock players up on hit.
Large Cone – This attack is similar to cone. However, instead of a small cone it is a large one in front of the boss. This attack will deal a decent amount of damage and knocks up players that are hit.
Spin – Sigmund will spin his sphere in his hands around him. This creates a circle of damage around his body. Players caught in this circle will receive a decent amount of damage per second.
Spheres – The boss will slam his sphere into the ground sending out a one orb in each cardinal direction (N, E, S, W). This attack is then repeated but the orbs are sent out in each ordinal direction (NE, SE, SW, NW). The second wave of spheres can be avoided by standing in the path of the first sphere wave. When hit these spheres will deal low amounts of damage. After Sigmund revives the second wave of spheres from this attack are enhanced. Instead of 4 spheres there will be 8 send out in each ordinal direction.
Falling Spheres – Sigmund shoots a sphere into the sky and a big sphere will fall down on top of each player and deal a decent amount of damage. One of these spheres will split up into smaller spheres upon hitting the ground.
Puddles – The boss will spawn puddles at random locations. They will remain on the ground for a long duration and will deal damage to any player standing in them.
Flares – Sigmund shoots flares into the sky. After a delay they will fall back to the ground leaving puddles. These puddles will remain for a long duration and will deal damage to any player standing in them.